只有累積,沒有奇蹟

2019年1月13日 星期日

[.NET] 檔案名稱: redirection.config 錯誤: 無法讀取設定檔案,因為權限不足

問題
假日在自己練習要透過 WebAPI 對 IIS Server 進行 App Pool 的操作,呼叫寫好的 API 接口時一直噴錯誤,檔案名稱: redirection.config 錯誤: 無法讀取設定檔案,因為權限不足,這篇文章簡單紀錄處理問題過程
處理方式
An error has occurred.
檔案名稱: redirection.config 錯誤: 無法讀取設定檔案,因為權限不足 
System.UnauthorizedAccessException

於 Microsoft.Web.Administration.Interop.IAppHostAdminManager.GetAdminSection(String bstrSectionName, String bstrPath) 於 Microsoft.Web.Administration.Configuration.GetSectionInternal(ConfigurationSection section, String sectionPath, String locationPath) 於 Microsoft.Web.Administration.ServerManager.ApplicationPoolsSectionCreator() 於 Microsoft.Web.Administration.Lazy.Initialize[T](T& target, CreateInstanceDelegate`1 valueFactory) 於 Microsoft.Web.Administration.ServerManager.ApplicationPoolCollectionCreator() 於 Microsoft.Web.Administration.Lazy.Initialize[T](T& target, CreateInstanceDelegate`1 valueFactory) 於 WebAPI.Controllers.ValuesController.RestartApplication() 於 C:\Users\marcustung\source\repos\WebAPI\WebAPI\Controllers\ValuesController.cs: 行 54 於 lambda_method(Closure , Object , Object[] ) 於 System.Web.Http.Controllers.ReflectedHttpActionDescriptor.ActionExecutor.<>c__DisplayClass6_1.b__3(Object instance, Object[] methodParameters) 於 System.Web.Http.Controllers.ReflectedHttpActionDescriptor.ExecuteAsync(HttpControllerContext controllerContext, IDictionary`2 arguments, CancellationToken cancellationToken) --- 先前擲回例外狀況之位置中的堆疊追蹤結尾 --- 於 System.Runtime.ExceptionServices.ExceptionDispatchInfo.Throw() 於 System.Runtime.CompilerServices.TaskAwaiter.HandleNonSuccessAndDebuggerNotification(Task task) 於 System.Web.Http.Controllers.ApiControllerActionInvoker.d__1.MoveNext() --- 先前擲回例外狀況之位置中的堆疊追蹤結尾 --- 於 System.Runtime.ExceptionServices.ExceptionDispatchInfo.Throw() 於 System.Runtime.CompilerServices.TaskAwaiter.HandleNonSuccessAndDebuggerNotification(Task task) 於 System.Web.Http.Controllers.ActionFilterResult.d__5.MoveNext() --- 先前擲回例外狀況之位置中的堆疊追蹤結尾 --- 於 System.Runtime.ExceptionServices.ExceptionDispatchInfo.Throw() 於 System.Runtime.CompilerServices.TaskAwaiter.HandleNonSuccessAndDebuggerNotification(Task task) 於 System.Web.Http.Dispatcher.HttpControllerDispatcher.d__15.MoveNext()
從 MSDN 可以得知 UnauthorizedAccessException 為 當作業系統因為 I/O 錯誤或特定類型的安全性錯誤而拒絕存取時,所擲回的例外狀況。研判是因為權限不足導致此錯誤發生,此專案是在本機 IIS 自行建立應用程式,我們可以透過工作管理員得知執行 w3wp.exe 的使用者是 DefaultAppPool,預設的身分只有用戶權限,權限較低在設計上是安全以確保不會因為漏洞而權限大開
在 IIS 7.5 之後新增 ApplicationPoolIdentity 虛擬帳戶,改善了過去為了 IIS Application 設定權限定義很多不同的 User Roles 管理問題,詳細介紹可以參考 保哥blog,這次遇到的問題可以透過設定ApplicationPoolIdentity 解決,說明步驟如下

設定 ApplicationPoolIdentity
Step 1 : 開啟 IIS > 選擇應用程式集區 > 選擇要設定的 Application Pool > 按下進階設定
Step 2 : 拉到最下方 > 選擇 識別 
Step 3 : 說明可以看到是設定應用程式集區以選擇的方式 其中有四個選項
  • Application Pool Identity : 預設是 ApplicationPoolIdentity
  • Network Service : 其中包含可用來在遠端電腦上的資源的存取權的低層級的使用者存取權限
  • Local System : 這是具有多個與 Network Service 或 Local Service 帳戶的使用者權限的帳戶。
  • Local Service : 其具有低層級的存取權限。 您不需要在遠端電腦上的資源的存取權的情況下使用此設定。

Step 4 : 選擇 LocalSystem,按下確定

在重試一次即可正常使用,宣告結案 !!

參考
Application Pool Identities
step-1-configure-application-pool-identity

2019年1月12日 星期六

[.NET] 使用 ParseQueryString 取得網址參數

說明
在古早的時代要取得網址參數時,都會自己寫一段 function 的方式來 Parse 需要解析的 Querystring 值,透過 For 迴圈將帶進來的字串取得 key 與 value 後放到 dictionary 集合中,Code 如下
public static Dictionary QueryParse(string url)
{
    Dictionary qDict = new Dictionary();
    foreach (string qPair in url.Substring(url.IndexOf('?') + 1).Split('&'))
    {
     string[] qVal = qPair.Split('=');
 qDict.Add(qVal[0], Uri.UnescapeDataString(qVal[1]));
    }
    return qDict;
}

public static string QueryGet(string url, string param)
{
    var qDict = QueryParse(url);
    return qDict[param];
}

Utility.ParseQueryString
回到主題,後來發現 .Net Framework 在 System.Web 底下有提供 HttpUtility.ParseQueryString API 解決自己硬幹的苦惱,可以將要解析的 Querystring 值作為參數給此方法後會回傳 NameValueCollection,且提供多載方法可以指定編碼方式 (預設是 UTF8),Sample Code 如下
static void Main(string[] args)
{
    Uri uri = new Uri("http://www.ABC.com/Search.aspx?var1=1&var2=2&var3=Marcus");

    // prefix ?
    string querystring = uri.Query;
    if (!string.IsNullOrEmpty(querystring) && querystring.Contains("?"))
    {
     querystring = querystring.Replace("?", string.Empty);
    }

    var nvc = HttpUtility.ParseQueryString(querystring);
 
    // 取得全部
    GetAllParams(nvc);

    // 取得單一值
    GetParam(nvc, "var1");

    Console.ReadKey();
}

private static void GetParam(NameValueCollection nvc, string key)
{
    Console.WriteLine("---------------------------");

    var result = nvc.Get(key);

    Console.WriteLine($"Get Single Param is {result}");
}

private static void GetAllParams(NameValueCollection nvc)
{
    Console.WriteLine("---------Get All Params---------");
    foreach (String s in nvc.AllKeys)
    {
     Console.WriteLine($"key[{s}] - value {nvc[s]}");
    }
}
程式說明 : 
  • Line 7-9 : 處理 Uri Querystring 中的問號邏輯
  • Line 12 : 透過 HttpUtility.ParseQueryString 解析 Uri 的 Querystring
  • Line 15 : 取得全部參數方法 
  • Line 17 : 取得單一參數方法
輸出結果如下

安全議題
透過 Querystring 取得參數值變得更方便了,但更要注意的是安全的議題,使用者傳來的 Request 都具有潛在的安全性威脅,如果盲目地相信使用者的輸入參數帶入資料庫查詢就會造成 SQL Injection,根據 OWASP TOP 10 - 2017 報告提到 Injection 攻擊都是站穩榜首 (如下圖),因此在開發時更應該多加留意

參考

2019年1月11日 星期五

2019年1月10日 星期四

[PowerShell] 設定 IIS - 建立 Application Pool、WebSite

前言
PowerShell是微軟公司開發的任務自動化和組態管理框架,相信有接觸過 CI / CD 的人都是聽過且用過這工具,今天就來簡單介紹如何使用 PowerShell 來建立 Application Pool 跟 WebSite 的過程

指令說明
輸入指令
相關指令可以參考 WebAdministration
# import module
Import-Module WebAdministration
cd IIS:\AppPools\

# Create WebSite
New-Item IIS:\Sites\DemoWeb -bindings @{protocol="http";bindingInformation=":80:localhost"} -physicalPath D:\Demo\DemoWeb

# Create App pools
New-item IIS:\AppPools\DemoPool | Set-ItemProperty -Name "managedRuntimeVersion" -Value "v4.0"
程式說明 : 
  • Line 2 : 先 Import-Module WebAdministration 載入 IIS 管理模組
  • Line 6 : 使用 New-Item command 建立 WebSite第一個參數是 bindings 的資訊 : localhost  80 port
    第二個參數是應用程式的位置 : D:\Demo\DemoWeb
  • Line 9 : 建立 AppPool
    設定 CLR 為 4.0 以及 Name 為 managedRuntimeVersion
確認結果
在 PowerShell 按下執行,接著輸入以下指令確認是否成功
PS C:\> Get-IISAppPool
PS C:\> Get-Website

還記得之前有提到 [IIS] 如何解決網站第一個請求 Request 特別慢 ? 為了加快 Application 啟動問題,需要在 IIS 設定 preloadEnabled 和 AlwaysRunning為 true,我們希望在建立 AppPool & WebSite 時將這兩個設定加在指令中,讓部署時一致化不用在進到 Server 分別調整

安裝 Application Initialization
PS C:\> $webAppInit = Get-WindowsFeature -Name "Web-AppInit"
Install-WindowsFeature $webAppInit -ErrorAction Stop
新增 WebSite & AppPool 
# Create WebSite
New-Item IIS:\Sites\DemoWeb -Name applicationDefaults.preloadEnabled -Value True

# Create App pools
New-item IIS:\AppPools\DemoPool | Set-ItemProperty -Name "startMode" -Value "AlwaysRunning"

    參考
    powershell-snap-in-creating-web-sites-web-applications-virtual-directories-and-application-pools
    enable-IIS-preloadEnabled-and-AlwaysRunning-using-PowerShell

    2019年1月9日 星期三

    2019年1月8日 星期二

    [UnitTest] Reflect.cs not found in NUnit

    問題
    最近在新的專案寫 UnitTest 過程中,執行完後 Visual Studio 卻跳出 Source Not Fount : Reflect.cs not found 錯誤,但單元測試還是可以成功,如下圖
    且透過 debug UnitTest 時發現測試的值也沒問題,經搜尋後發現是 Visual Studio 2017 IDE 設定問題,將,這篇文章簡單紀錄處理問題過程

    處理方式
    釐清問題
    按下 Source search information 可以發現更多錯誤內容及資訊,發現是 Debugger 在 debug 的過程中找不到 nUnit Framework 的 Reflect.cs 檔案
    Locating source for 'C:\src\nunit\nunit\src\NUnitFramework\framework\Internal\Reflect.cs'. Checksum: SHA1 {db ae 17 40 7a 46 56 f6 79 ee 5a 25 c7 7 94 f1 97 c1 a5 de}
    The file 'C:\src\nunit\nunit\src\NUnitFramework\framework\Internal\Reflect.cs' does not exist.
    Looking in script documents for 'C:\src\nunit\nunit\src\NUnitFramework\framework\Internal\Reflect.cs'...
    Looking in the Edit-and-Continue directory 'D:\SourceCode\Git\urapplication folder\'...
    The file with the matching checksum was not found in the Edit-and-Continue directory.
    Looking in the projects for 'C:\src\nunit\nunit\src\NUnitFramework\framework\Internal\Reflect.cs'.
    The file was not found in a project.
    Looking in directory 'D:\'...
    Searching for documents embedded in the symbol file.
    An embedded document was not found.
    The debug source files settings for the active solution indicate that the debugger will not ask the user to find the file: C:\src\nunit\nunit\src\NUnitFramework\framework\Internal\Reflect.cs.
    The debugger could not locate the source file 'C:\src\nunit\nunit\src\NUnitFramework\framework\Internal\Reflect.cs'.
    根據之前處理問題的經驗,看到 debugger 會想到會不會與 Just My Code 有關係,經確認後發現有人在NUnit github 留言也遇到類似問題,接著到 Visual Studio 確認設定是否有開啟

    設定 Just My Code 
    Step 1 : 搜尋設定可以到 IDE 右上角,Quick Lauch 搜尋需要找的設定,會列出該設定位置
    Step 2 : Just My Code 打勾
    Step 3 : 在重新測試一次,此問題就不會在發生了

    補充 : Just My Code 是甚麼
    當在 Application 進行 Debug 的時候,debugger 會嘗試去找正在執行的 symbols 中的代碼,它才可以知道開發者在哪段 Code 有設定中斷點,蒐集加入監看示的變數內容或是檢查 Call Stack 等資訊,在 Visual Studio 中 debug 時預設會跳過不屬於此專案的代碼或是 assemblies,這設定名稱為 Just My Code,

    參考


    2019年1月3日 星期四

    [WEB API] 使用 Swagger 自動產生 WebAPI 技術文件

    Swagger 是什麼
    以下是 Swagger 官網說明
    “ Swagger UI is a collection of HTML, Javascript, and CSS assets that dynamically generate beautiful documentation from a Swagger-compliant API “ 
    Swagger 是一個可以將你的 API 接口變成可視化的服務,透過 Swagger 提供的工具能動態產生HTML、CSS、Javascript 網頁版的文件,相對應的接口清單,接口的使用方式 (HTTP Method)、API 簽章(參數名稱) 以及直接在網頁上進行接口測試的動作,驗證 API 接口服務是否正常

    為什麼要用 Swagger
    好的開發文件可以讓 User 清楚知道如何使用 API 接口,但大部分的工程師對於寫文件這件事都沒什麼好感,但偏偏在開發時又希望有清楚的文件 (好難搞...),以下整理個人覺得帶來的好處
    • 建立文件 : 專案有寫出來的 Code 等同於技術文件,減少額外寫文件及維護文件的成本
    • 方便溝通 : 讓你的服務端使用者像是前端、QA、Support 同仁清楚的知道接口相關資訊
    • 方便測試 : 使用線上文件進行測試,透過網頁立即知道 API 返回的結果,節省溝通時間提升效率
    如何使用
    要在 WebAPI 專案使用 Swagger 很簡單,只需要透過 Nuget 下載安裝 Swagger 相關 package即可,以下整理基本安裝過程與步驟

    安裝 Swashbuckle
    Step 1. 在 Web API 專案按右鍵 > Manage Nuget Package
    Step 2. 點選 Browser > 搜尋框輸入 Swashbuckle > 下載
    Step 3. 安裝 Swashbuckle 過程中會一併安裝 Swashbuckle.Core 套件
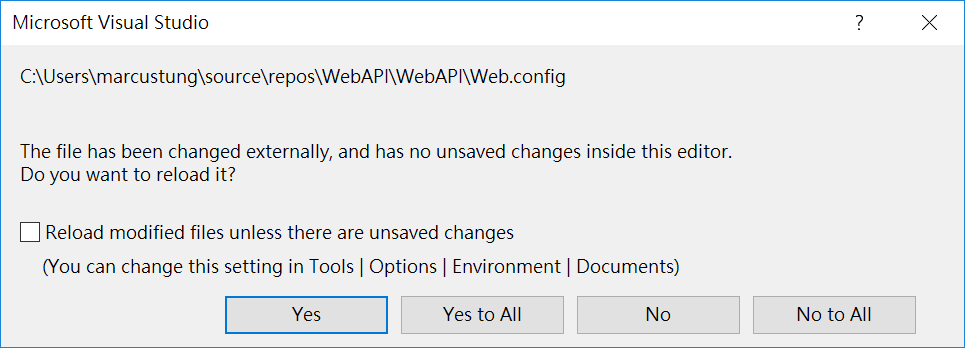
    Step 4. 安裝完畢會提示 Web.Config 需要 Reload,選擇  Yes to all
    Step 5. 如何確定有安裝成功 ? 可以到專案點開 reference > 確認有 Swashbuckle.Core 就代表安裝完成啦
    設定專案 XML 註解
    安裝完畢後接下來設定專案輸出的 XML 註解,註解來源是從 Class 上方按下三個反斜線 "///" 區塊內容擷取的,專案預設不會開啟需要手動設定輸出註解位置,Swagger 在自動產生技術文件需要此資訊
    Step 1. 在 Web API 專案按右鍵 > 選擇 Properties
    Step 2. Tab 選擇 Build > 選取 XML documentation file 路徑輸入 XML 要產生的路徑位置
    Step 3. 接著在 Controller 方法加上註解,按下 "///" 會自動產生 Comment
    設定完後每次專案建置完會在 App_Data folder 產生 XML 檔案,但 Visual Studio 在 compiler 同時也會檢查專案中哪些地方尚未加上 XML Comment (Compiler warning CS1591),會在建置完後提示如下圖片顯示
    Step 4. 覺得不想看到沒關係把它關掉就好 : 選擇 Build > Errors and Warnings > Suppress warnings 輸入 1591,透過設定不再提示 missing xml Warnings 訊息資訊

    設定 SwaggerConfig
    安裝完 Swagger package,產生完專案 XML Comment,下一步就是告訴 Swagger 產生線上文件的位置,Swagger 安裝完後會在專案 App_Start 資料夾下新增 SwaggerConfig.cs 檔案,開啟檔案做以下調整
    Step 1. 在 SwaggerConfig.cs 搜尋 IncludeXmlComments > 將此行反註解
    Step 2. 註解拿掉後會發現缺少 GetXmlCommentsPath 方法,這邊就是定義剛專案檔設定的 XML Document 位置,因此直接加上此方法與 Code 如下
    private static  string GetXmlCommentsPath()
    {
        return String.Format(
            @"{0}\App_Data\XmlDocument.xml",
            AppDomain.CurrentDomain.BaseDirectory);
    }
    
    使用 swagger 
    完成上述步驟你衷心盼望的 WEB API 文件就完成了,在 Application 網址後加上 /swagger,就可以看到swagger 幫你產生的 API 線上文件
    可以看到範例專案中 ValueController 底下有提供五個 API 接口,呼叫 API 時分別要透過 HTTP 的哪種 Method 方法以及 Route、Action Name 名稱,點擊 Method 會提供更多 API 細節
    簡單說明 : 
    • 1. API 註解 : 稍早在 Code 加上的註解 (XML) 已呈現在網頁,除此之外還列出此接口所需要的參數型別資訊
    • 2. 測試接口 : 按下 Try it out,可以直接根據你所輸入的參數直接打 API 位置,方便驗證正確性
    • 3. 測試回傳 : 可以看到打完 API 後回傳資訊,像是 Header 內容、Status Code、Response 物件
    Summary
    Swagger 幫助我們線上Web API Application 產生文件,透過一些簡單的設定加上 XML Remark就能夠達到這件事,讓寫文件這件事變得沒那麼無聊,這篇分享 Swagger 基本的操作說明及用法,之後預計會(咦 是拖稿嗎)在分享更多實務上遇到的情境需求及使用心得

    參考
    Swagger初探
    swagger-ui
    ASP.NET Web API 文件產生器 - 使用 Swagger

    2019年1月1日 星期二

    [UnitTest] Visual Studio 2017 新增單元測試時沒有 NUnit 選項 ?

    前言
    新筆電總是讓人充滿驚喜,在使用上除了要重新安裝常用的開發工具外,像是 Visual Studio & SQL Server..等必須工具,還有些常用的套件與小工具也要一併安裝,NUnit 是蠻常用的 Test Framwroek 之一,在寫測試時在要測試的 method 下按下右鍵 create Unit Tests,選擇要使用測試的 Test Framework 即可,在測試專案中預設只有 MSTest 選項,如果需要 NUnit 則需要另外安裝,這篇文章簡單紀錄安裝過程

    安裝 NUnit extension
    簡單整理安裝完畢會發生甚麼事情
    - Download URL 
    - Visual Studio 2017 使用
    - 預設會安裝 NUnit 2 & 3
    - 新增 IntelliTest (Enterprise Only)

    套件安裝
    Step 1 : 進入 Test Generator NUnit extension > 按下 Download 下載套件
    Step 2 : 會跳出需要安裝的 IDE 版本,接著無腦式的按下一步
    Step 3 : 安裝過程會提醒你關閉 Visual Studio,安裝完畢後如下圖
    Step 3 : 安裝過程會提醒你關閉 Visual Studio,安裝完畢後如下圖

    重新開啟 Visual Studio
    大功告成,新增 Unit Test 選單出現 NUnit 了啦 !! 
    參考
    Get started with unit testing

    Copyright © m@rcus 學習筆記 | Powered by Blogger

    Design by Anders Noren | Blogger Theme by NewBloggerThemes.com