只有累積,沒有奇蹟

顯示具有 Nuget 標籤的文章。 顯示所有文章

2019年2月9日 星期六

[Nuget] 使用 NuGet Package Explorer 製作 Nuget 套件

問題 
在上一篇介紹了如何架設公司內部 nuger server,架設完畢後會使用 nuget push 指令將開發完 Library 上傳到公司內部 nuget server 上,但每次都要透過手動打指令 push 難道沒有更快的方法了嗎 ? 今天就要來介紹一套好用的工具 Nuget Package Explorer 可以省去打指令的動作,透過 GUI 的介面將開發好的 Library 上傳到共用或是私人架設的 nuget server 上面


Nuget Package Explorer 
NuGet Package Explorer (NPE) 是一個好用的 GUI 應用程式,透過此應用程式快速打包成 nuget package 檔佈署到 nuget server 上面,並定義相關 package 版本資訊,讓需要使用的專案引用下載,從 官方網站 介紹得知,可以透過 Microsoft Store 與 Chocolatey 進行安裝的動作,下面分別針對兩種安裝方式簡單介紹

使用 Microsoft Store 安裝
安裝網址 : Microsoft Store 
打開連結後按取得 > 下載 > 進行安裝 > 啟動
使用 Chocolatey 安裝
透過 windows 安裝神器來安裝,步驟如下
  • 使用 admin 權限開啟 powershell
  • 輸入指令安裝 :  
    choco install nugetpackageexplorer
新增 Package  
透過以下步驟說明如何使用 Nuget Package Explorer 佈署至 nuget server
Step 1 : 首先開啟 Nuget Package Explorer > 選擇 create a new package
Step 2 : 開啟後畫面主要分為兩區塊
  • package metadata : 說明此 package 檔案資訊,ex : 版本、package 說明...etc 
  • package contents : 為要上傳 package 內容,ex : dll, json 相關檔案 
Step 3 : 接著先設定 metadata 內容,按下編輯,更新 package 名稱、內容、版號資訊、開發者,更新完成後在綠色勾勾存檔。
Step 4 : metadata 設定完成後,接著在右方區塊按滑鼠右鍵新增 Library folder,add exist file 在將此 package 需要的檔案新增至 content 區塊,也可以使用檔案拖拉的方式新增檔案,可參考以下 gif 檔示範

佈署至 Nuget server 
Step 1 : 點選 File > save 檔案才可進行發布的動作,這裡可以看到已經將上述動作打包成 nuget package 檔案 (.nupkg)
Step 2 : 點選 File > publish > 輸入要佈署的 nuget server url、與 api key 等資訊,這裡是佈署到我 local 環境測試的 Nuget server,在按下 publish 即可上傳到指定的 nuget server,佈署成功會顯示 success 文字 (黃色區塊)

確認新增的 Package 
透過以上步驟已成功上傳到 nuget server,接著來確認其他專案是否可以正常引用
Step 1 : 在 Visual Studio 加入 local 端的 nuget server 名為 provateNugetServer
Step 2 : 在 nuget manage 右上角 Package source 選擇剛剛加入的 privateNugetServer,左方區塊就會出現剛剛成功上傳的 package TestSDK,右方區塊則顯示上傳時所輸入的 metadata 內容資訊,ex : 開發者、版號、上傳時間與 package 內容說明 
後續動作就與一般使用方式相同不在詳細說明,確認上傳成功 !!!

心得
工具整體上操作不難,透過幾個簡單的步驟用手動的方式將共用的 library 上傳至 nuget server,但如果每次更新都要手動方式更新就稍嫌麻煩了,佈署與每次 build 完加版號這類的動作可以透過 Jenkins 工具完成,才可以省下更多時間與整體流程最佳化的動作。

參考
NuGetPackageExplorer

2019年2月8日 星期五

[Nuget] The term 'nuget.exe' is not recognized as the name of a cmdlet, function, script file, or operable program

問題 
接開發完 Libary 專案要上傳到 nuget server 時,要將 package 檔案透過指令 push 噴 error 錯誤訊息 nuget.exe : The term 'nuget.exe' is not recognized as the name of a cmdlet, function, script file, or operable program. Check the spelling of the n ame, or if a path was included, verify that the path is correct and try again. ,此篇簡單紀錄遇到這問題時該如何解決。

如何解決
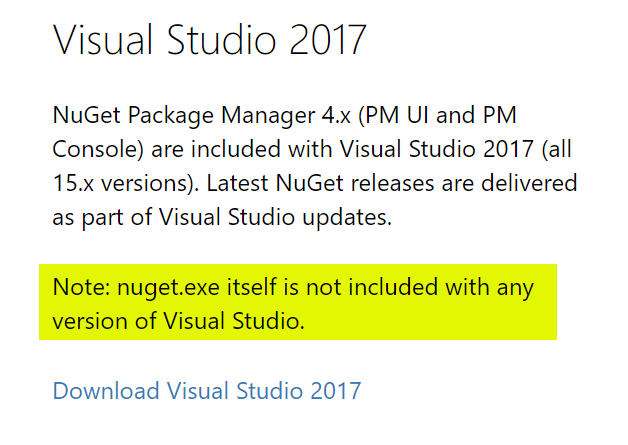
Nuget 官網下載網頁可以得知,在 Visual Studio 任何版本並不包含 nuget.exe,如果有需要上傳 package 檔案需要另外安裝 NuGet command line tool,目前 nuget.exe 推薦的版本為 v4.9.2

可以透過下列兩種方式安裝 nuget command line tool
Package Manage Console
Tools > Nuget Package Manager > Package Manage Console 輸入以下指令安裝
Install-Package NuGet.CommandLine
Manage Nuget Package
Tools > Manage Nuget Package > 輸入 NuGet.CommandLine > Install

Retry
安裝完畢之後,我們重新 push 一次
nuget.exe push {package file} {apikey} -Source http://localhost/nuget
如上圖所示即可透過 command line 上傳成功
Happy new year :)

參考
nuget


2019年2月7日 星期四

[Nuget] 架設公司內部 Nuget Server

前言 
在開發上常常會遇到某些代碼是跨專案共用的,在 .NET 中會將重複使用的代碼打包成「套件」,其中包含了編譯後的 dll 以及相關的檔案資訊,接著將套件內容上傳到 Nuget Server 上提供開發者下載使用,Nuget server 有分共用與私人主機兩種,共用的 nuget server 上有相當多好用的 libary 供開發者下載,例如常用的 NLog、newtonsoft.json、NUnit...等各種好用的 package,從官方得知截至目前為止共用的 nuget server 有 14 萬 package 供開發者使用,其全部 package 總下載量達到 150 億次,對細節有興趣可以參考 An introduction to NuGet 官方介紹這裡不在多加介紹。有些團隊常用的 Library 是公司內使用不方便上傳到共用的 nuget server 上面,今天就來介紹如何架設私有的 Nuget Server。

安裝步驟
要架設私有的 Nuget Server 可以透過共用的 nuget server 下載 nuget.server 套件,安裝後進行上傳資訊的設定,例如 上傳的api key、目錄位置..等資訊,詳細步驟說明如下
下載 nuget.server package
Step 1 : 在 Visual Studio 開啟新專案 > 選擇 Web > ASP.Net Web Application > 輸入 Project Name > OK
Step 2 : 選擇空白專案 > OK
Step 3 : 下載 Nuget.Server > 到 Visual Studio 右上角 輸入 nuget > 選擇 Manage Nuget Package
Step 4 : 輸入 nuget.server > 點擊 nuget.server 套件 > 下載  
Step 5 : 會提醒要安裝的資訊與相關套件 > 沒問題就按下 OK
 
透過以上步驟,完成下載 nuget.server的動作 

設定 nuget server 資訊
在安裝 nuget.server 過程中會在專案的 web.config 加上 nuget server 相關設定資訊,內容如下
     <staticContent>
      <mimeMap fileExtension=".nupkg" mimeType="application/zip" />
    </staticContent><modules runAllManagedModulesForAllRequests="true">
      <remove name="WebDAVModule" />
    </modules><security>
      <requestFiltering>
        <!-- maxAllowedContentLength is specified in Bytes -->
        <requestLimits maxAllowedContentLength="31457280" />
      </requestFiltering>
    </security></system.webServer>
    <appSettings>
    <!--
    Determines if an Api Key is required to push\delete packages from the server. 
    -->
    <add key="requireApiKey" value="true" />

    <!-- 
    Set the value here to allow people to push/delete packages from the server.
    NOTE: This is a shared key (password) for all users.
    -->
    <add key="apiKey" value="123456" />

    <!--
    Change the path to the packages folder. Default is ~/Packages.
    This can be a virtual or physical path.
    -->
    <add key="packagesPath" value="" />

    <!--
    Change the name of the internal cache file. Default is machine name (System.Environment.MachineName).
    This is the name of the cache file in the packages folder. No paths allowed.
    -->
    <add key="cacheFileName" value="" />

    <!--
    Set allowOverrideExistingPackageOnPush to false to mimic NuGet.org's behaviour (do not allow overwriting packages with same id + version).
    -->
    <add key="allowOverrideExistingPackageOnPush" value="false" />

    <!--
    Set ignoreSymbolsPackages to true to filter out symbols packages. Since NuGet.Server does not come with a symbol server,
    it makes sense to ignore this type of packages. When enabled, files named `.symbols.nupkg` or packages containing a `/src` folder will be ignored.
    
    If you only push .symbols.nupkg packages, set this to false so that packages can be uploaded.
    -->
    <add key="ignoreSymbolsPackages" value="true" />

    <!--
    Set enableDelisting to true to enable delist instead of delete as a result of a "nuget delete" command.
    - delete: package is deleted from the repository's local filesystem.
    - delist: 
      - "nuget delete": the "hidden" file attribute of the corresponding nupkg on the repository local filesystem is turned on instead of deleting the file.
      - "nuget list" skips delisted packages, i.e. those that have the hidden attribute set on their nupkg.
      - "nuget install packageid -version version" command will succeed for both listed and delisted packages.
        e.g. delisted packages can still be downloaded by clients that explicitly specify their version.
    -->
    <add key="enableDelisting" value="false" />

    <!--
    Set enableFrameworkFiltering to true to enable filtering packages by their supported frameworks during search.
    -->
    <add key="enableFrameworkFiltering" value="false" />

    <!--
    When running NuGet.Server in a NAT network, ASP.NET may embed the server's internal IP address in the V2 feed.
    Uncomment the following configuration entry to enable NAT support.
    -->
    <!-- <add key="aspnet:UseHostHeaderForRequestUrl" value="true" /> -->
    <!--
    Set enableFileSystemMonitoring to true (default) to enable file system monitoring (which will update the package cache appropriately on file system changes).
    Set it to false to disable file system monitoring.
    NOTE: Disabling file system monitoring may result in increased storage capacity requirements as package cache may only be purged by a background job running 
    on a fixed 1-hour interval.
    -->
    <add key="enableFileSystemMonitoring" value="true" />
  </appSettings>
這裡就小弟的了解,簡單說明各設定值資訊
  • requireApiKey : 當開發者 push/delete package 時是否需要 api key 資訊
  • apiKey : 設定 api key 數值作為讓開發者 push/delete package 使用
  • packagesPath : 更改上傳 package 檔案存放的位置,預設為 project package folder 目錄
  • cacheFileName : 更改內部 cache 的名稱,預設為 System.Environment.MachineName
  • allowOverrideExistingPackageOnPush : 是否允許覆蓋具有相同 ID + 版本號的 package。False : 不允許
  • ignoreSymbolsPackages : 是否要過濾 symbols package,設定為 true 時會忽略文件名稱含有 '.symbols.nupkg' 或是 '/src' 的package 內容.
  • enableDelisting : 是否啟用 delist 設定,當開啟 delist 設定時下 delete command line 會對應到 nupkg 的 hiddle 屬性,而不是直接刪除 package 檔案。對於 hiddle 的 package 仍可透過指定版本的 command line 進行 install 的動作
  • enableFrameworkFiltering : 搜尋時是否啟用過濾 framework 功能
  • enableFileSystemMonitoring : 是否啟用文件系統監控機制,當設定為 true 時候啟用文件更新時會適當更新 cache 資料
Publish & Test Project
接著為了簡單測試我在本機環境 IIS 架設 nuget application,並透過 Visual Studio publish 功能至 IIS 設定的 nuget server 路徑下,步驟如下
Step 1 : 使用 VS publish 功能,將 Nuget server 相關 application 發佈到指定資料夾,ex : D:\nugetserver
Step 2 : 開啟 IIS 並建立新站台為 nuget、指定 application 路徑位置、port number,按下確定
Step 3 : 在瀏覽器網址輸入稍早 IIS 設定的網址與 port number,localhost:9487 即可看到 nuget server 已架設完成
安裝成功,打完收工 ! 

後續
上面簡單介紹如何架設團隊專用的 nuget server,成功的踏出第一步,但後續還有很多細節是需要注意的,例如 push package 時是透過 command line 到 nuget server,但其實可以透過工具來協助上傳的動作;安裝完 nuget server 但如果 push 失敗要如何得知錯誤訊息資訊 log;除了透過 install nuget.server package 是否還有其他更好用的 nuget server ...等以上內容希望之後在分享,若有更多與 nuget 相關資訊也歡迎留言討論,謝謝 :) 


參考
nuget
搭建公司内部的NuGet Server

2018年12月20日 星期四

[AWS] 使用 AWS SDK上傳檔案到 AWS S3

前言
最近在與第三方做串接時有個需求是要將圖片存起來放在 Application Server 上,與同事討論建議將圖片放在AWS S3 上,多年前有微軟剛推出 Azure 時有接觸過一些,但這幾年隨著年紀增長早已忘光光,這篇簡單紀錄 C# 透過 AWS SDK 將圖片上傳到 AWS S3 上的步驟與要注意的細節

AWS S3 
Amazon Simple Storage Service 功能簡稱 S3,是Amazon的物件儲存服務主要提供使用者存放 Data 像是 html, css, js...等靜態檔案,上傳前需要建立儲存體 (Buckets) 來存放需要放在的物件接著透過 AWS Manager Console 的後台服務上傳物件到雲端上,使用者就可以透過 S3 的服務讀取到上傳的資料,如下圖所示

安裝 AWS SDK 
除了可以透過 AWS Manager Console 後台上傳檔案AWS 也提供 SDK 讓開發者可以透過 API 來上傳儲存的物件,在 .NET 有兩種方式可以安裝此套件
1. 可以到 nuget 主控台 輸入下列指令下載 AWS SDK 套件
Install-Package AWSSDK -Version 2.3.55.2
2. 到 nuget 管理員輸入 AWSSDK 直接下載

設定 Config Key
在 Application Config 中設定 AccessKey , SecretKey

使用 AWS SDK 上傳物件到 S3
參考 開發人員指南 上傳 Code 如下
using System;
using System.Threading.Tasks;
using Amazon.S3;
using Amazon.S3.Transfer;
using Amazon;
using Amazon.S3.Model;

namespace AWS
{
    class blog
    {
        private const string bucketName = "your bucketName";
        private const string keyName = "Test.png";
        private const string filePath = @"D:\Test.png";
        private static readonly RegionEndpoint bucketRegion = RegionEndpoint.APNortheast1;
        private static IAmazonS3 s3Client;

        static void Main(string[] args)
        {
            s3Client = new AmazonS3Client(bucketRegion);

            try
            {
                PutObjectRequest ObjectRequest = new PutObjectRequest
                {
                    BucketName = bucketName,
                    FilePath = filePath,
                    Key = keyName,
                    CannedACL = S3CannedACL.PublicRead
                };

                // upload object
                PutObjectResponse myResponse = s3Client.PutObject(ObjectRequest);
            }
            catch (AmazonS3Exception e)
            {
                Console.WriteLine("Error encountered on server. Message:'{0}' when writing an object", e.Message);
            }
            catch (Exception e)
            {
                Console.WriteLine("Unknown encountered on server. Message:'{0}' when writing an object", e.Message);
            }
        }
    }
}
 
程式說明 : 
  • Line 12 : 要上傳到的 bucket Name 儲存體
  • Line 13 : 要上傳到的位置 + 檔名 , 舉例 : 可以透過目錄區分物件 public / test / test.jpg
  • Line 14 : 上傳物件路徑 
  • Line 15 : 定義 RegionEndpoint , 在一開始建立 bucket 會設定機房的位置 (參考備註)
  • Line 20 : 初始化 s3Client 物件 透過建構子定義 Endpoint
  • Line 24 : 初始化要上傳的物件 putObjectRequest,設定要上傳到的 bucketName 物件路徑 與 設定此物件為公開 (非必要)
  • Line 24 : 使用 putObject 方法上傳物件
使用 AWS SDK 上傳物件到 S3 (非同步)
如果在開發上是有非同步的需求,可以參考下面
using System;
using System.Threading.Tasks;
using Amazon.S3;
using Amazon.S3.Transfer;
using Amazon;

namespace AWS
{
    class blog
    {
        private const string bucketName = "urbucketName";
        private const string filePath = @"D:\Test.png";
        // Specify your bucket region (an example region is shown).
        private static readonly RegionEndpoint bucketRegion = RegionEndpoint.APNortheast1;
        private static IAmazonS3 s3Client;

        static void Main(string[] args)
        {
            s3Client = new AmazonS3Client(bucketRegion);
            UploadFileAsync().Wait();
        }

        private static async Task UploadFileAsync()
        {
            try
            {
                var fileTransferUtility = new TransferUtility(s3Client);
                await fileTransferUtility.UploadAsync(filePath, bucketName);

                Console.WriteLine("上傳完成");
            }
            catch (AmazonS3Exception e)
            {
                Console.WriteLine("Error encountered on server. Message:'{0}' when writing an object", e.Message);
            }
            catch (Exception e)
            {
                Console.WriteLine("Unknown encountered on server. Message:'{0}' when writing an object", e.Message);
            }
        }
    }
}

程式說明 : 
  • Line 27 : 初始化 TransferUtility 物件 透過建構子定義 Endpoint
  • Line 28 : 透過 TransferUtility 的 UploadAsync 方法上傳物件到 S3 上
補充
在定義 BucketRegion 需特別注意要指定到你一開始建立的機房位置,如果指定錯誤的話會出現
Error encountered on server. Message:'The bucket you are attempting to access must be addressed using the specified endpoint. Please send all future requests to this endpoint.' when writing an object ? 
建立位置與對應 EndPoint 可以參考官方 AWS Regions and Endpoints 說明,避免踩雷 XDDD

參考
Amazon S3 Features
Upload a File to an S3 Bucket Using the AWS SDK for .NET (High-Level API)
使用AWS SDK for .NET
Build a Serverless Web Application

2018年11月23日 星期五

[Nuget] Nuget operation failed

前言
    為了取得/建置專案的方便,最近常遇到同事透過 powershell 指令使用svn取得最新的代碼並呼叫MSBuild自動建置專案,今天在執行完前同事所撰寫的 powershell script 後開啟專案跳出 Nuget operation failed 提示訊提,這種情況還是第一次遇到,新筆電與桌基平常都正常來記錄處理臭蟲的過程
症狀
  • 開啟Visual Studio 2017跳出錯誤訊息:Nuget operation failed,如下圖所示

  • 按下專案建置或重build一直無法順利建置成功,大部分錯誤訊息是 Nuget Package restone fail

  • Nuget Package Source 清單為空白 : 打開 Nuget Package Manager 加入新的Source,詭異的是新增source按下儲存還是無法加入,不管怎麼 add 都是空白的


處理方式

從症況來看是Visual Studio讀取 Nuget config異常無法順利,進行下列資訊確認
  1. 確認其他專案是否有此狀況 : 其他專案皆沒有此問題,只有這專案 Nuget loading時fail,因此懷疑是此專案 Nuget config問題,進行異常專案Nuget.Config的確認
    補充 : Nuget package source list 存放位置在 C:\Users\{yourName}\AppData\Roaming\NuGet
  2. 檢查專案 Nuget.config 設定 :  發現讀取來源與專案不同位置專案在 D槽 設定檔讀 C槽 (老天鵝! 實在太神奇了),因此在Visual Studio開啟時loading 不到正確的package source data,因此跳出Nuget operation failed錯誤訊息,將專案 nuget.config 指到正確目錄即可正常
  3. 重開讓 Visual Studio 讀取正確的 Nuget 設定檔,打完收工 !!

Copyright © m@rcus 學習筆記 | Powered by Blogger

Design by Anders Noren | Blogger Theme by NewBloggerThemes.com