只有累積,沒有奇蹟

2021年12月2日 星期四

[Azure] 建立 Azure Container Registry 並整合 Microsoft Team 通知

前言
在 上一篇 介紹了使用 Azure 的 Web App For Container 服務將 Docker Image 部署至 Microsoft Azure,在 Demo 過程中 Image 是放置在公開的 Docker Hub 上,但在實務上不太可能將應用程式 Docker Image 檔案公開,如果希望可以建立私有的 Docker 服務時可以使用 Azure 中的 Container Registry 服務,建立個人/公司專用的私人 Docker 上傳空間,這篇文章就來簡單介紹建立 Azure Container Registry 服務的步驟與操作,以及上傳完成之後發送通知給 Microsoft Teams 頻道的團隊成員若有問題或是錯誤的地方歡迎各方高手大大一起討論或給予指導

前置作業
在開始前需先檢查電腦中是否有安裝下列軟體,才可以順利進行後續的步驟

安裝 Microsoft Teams 
Teams 是微軟在 2018 年 7 月所推出的團隊協作平台,整合 Office 365、Skype 以及 Outlook 等功能,方便團隊在線上進行溝通的工作,有提供免費版本支援 40 種語系讓有需要的企業使用,更多詳細資訊可以參考 Teams 官方介紹。在此我們的應用情境是當有人上傳 Docker image 到 Azure Container Registry 時候會主動發送通知到 Teams 的頻道中,讓團隊的成員收到上傳 image 成功的消息。

安裝 Docker For Windows
在 Windows 作業系統要操作 Docker 那麼 Docker for windows 是不可或缺的工具,安裝 Docker 與操作細節可以參考小弟之前寫的 Docker for windows 初體驗 文章介紹,安裝傳送門 : Docker Desktop for Windows

建立 Container Registry
首先第一步是要先建立 Azure Container Registry,建立方式先到 Azure Portal 首頁選擇左上方建立資源 > 容器 > Container Registry
建立新的 Container Registry 需要輸入以下資訊
  • 登錄名稱 : 名稱輸入  dockerregistrylab  
  • 資源群組 : 可以選擇建立新的資源群組
  • 位置 : 這裡選擇亞洲日本西部
  • SKU : 與計價有關,一開始如果沒特別需求先選擇基本

  • 按下建立之後,很快的完成建立新的 Container Registry 的動作,在完成頁面可以看到稍早所設定的資訊像是群組、位置、伺服器與 SKU 等設定內容,這裡我們先將登入伺服器內容複製起來稍後測試上傳時會用到
    Docker Image上傳測試
    建立完 Container Registry 之後為了確保是可以使用的,因此我們進行簡單的上傳 Docker image 測試,首先使用 admin 開啟 powershell 視窗
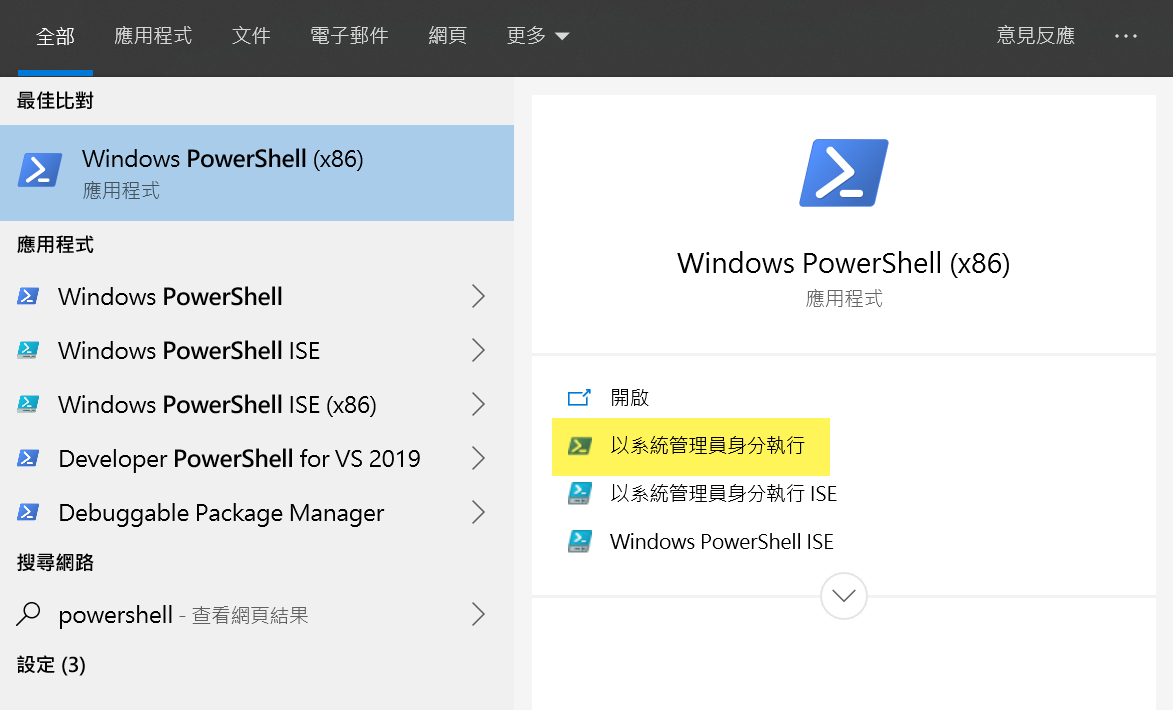
    首先要登入 Azure Container Registry,在稍早開啟的 powershell 中輸入  az acr login  + 伺服器名稱 來進行登入的動作 
    az acr login --name dockerregistrylab 
    回傳 Login Success 代表已登入成功,稍早提到要針對新增的 Container Registry 進行測試,因此我們可以下載 hello-world 的 Docker Image 檔在上傳到新增的 Azure Docker Server 上,先透過  docker pull  指令取得 image 檔案
    PS C:\Users\username> docker pull hello-world
    Using default tag: latest
    latest: Pulling from library/hello-world
    Digest: sha256:451ce787d12369c5df2a32c85e5a03d52cbcef6eb3586dd03075f3034f10adcd
    Status: Image is up to date for hello-world:latest
    docker.io/library/hello-world:latest 
    接著在 image 上透過  docker tag  指令加上 tag,在將 image 檔案透過  docker push  + 伺服器位置 指令將 Docker image 上傳到 dockerregistrylab 上面,其中要注意的伺服器是要輸入位置而不僅僅是名稱,在此範例中伺服器位置要輸入的值是 dockerregistry.azurecr.io ,指令操作過程如下 
    PS C:\Users\username> docker tag hello-world dockerregistrylab.azurecr.io/helloworld:v1
    PS C:\Users\username> docker push dockerregistrylab.azurecr.io/helloworld:v1  
    The push refers to repository [dockerregistrylab.azurecr.io/helloworld] 
    af0b15c8625b: Pushed
    v1: digest: sha256:92c7f9c92844bbbb5d0a101b22f7c2a7949e40f8ea90c8b3bc396879d95e899a size: 524                           PS C:\Users\marcustung> docker pull hello-world                                                                         Using default tag: latest                                                                                               latest: Pulling from library/hello-world                                                                                Digest: sha256:451ce787d12369c5df2a32c85e5a03d52cbcef6eb3586dd03075f3034f10adcd                                         Status: Image is up to date for hello-world:latest                                                                      docker.io/library/hello-world:latest                                                                                    
    PS C:\Users\username> 
    上傳完畢之後可以到 Azure Portal 介面確認上傳的檔案,可以到操作介面的左邊點選 存放庫 進行確認,可以看到稍早上傳的 helloworld Docker image 已上傳成功
    透過以上簡單的步驟,就可以在 Azure 上建立屬於自己的 Container Registry。

    整合 Teams
    一開始有提到另外一個代辦事項是當上傳 Docker image 後要發送訊息到 Teams 的頻道,告知團隊成員 image 檔案的狀態資訊,接下來在整合 Teams 發送通知將會分為以下幾個步驟
  • Teams 頻道 : 建立負責接收 ACR 訊息通知的頻道 
  • Azure Function : 當上傳成功時,接收 ACR Webhook 訊息處理後轉發給 Teams
  • ACR Webhook : 負責發送 ACR 通知的服務 

  • Teams 頻道
    首先在 Teams 中建立一個名字叫  ACR Version Notifier  的通知頻道,建立後在頻道按右鍵選擇 連接器
    連接器部分預設會以人氣指數進行排序,我們這次要接的服務是 Webhook
    接下來會需要定義 incoming webhook 連接器的名字,在此輸入  ACR webhook  ,並按下下方的建立按鈕
    在建立完成之後會有屬於此連接器的 url 位置,這是 Teams incoming webhook 負責接收訊息的 URL,這裡要複製下來等等在 Azure function 會用到
    Azure Function
    接下來動作是要建立 Azure function 服務,主要工作內容是當上傳 Docker Image 成功時,接收 ACR Webhook 所發出來的訊息轉發給 Teams,或許你會好奇為什麼不直接用 Teams 來接收 ACR Webhook 發送的通知就好,還要在特別建立 Azure Function 來做處理的動作,自己經過嘗試之後發現 Teams 在接收 incoming 的 json 內容要有 title 與 text 兩個欄位,但在 Azure webhook 發送時並未包含這兩個欄位,因此在串接上會有造成錯誤 Teams API 會回傳不接受訊息,此時可以透過在 Azure Function 上撰寫簡單的 C# 代碼進行轉換即可解決此問題。
    建立 Azure function 可以透過很多種方式來建立,這裡使用的是從 Portal 上直接建立,如果想了解其他建立方式可以參考官網說明文件 : 傳送門,在 Azure Portal 左邊 menu 選單點擊 建立資源,應用程式名稱輸入  acrnotifyteams  
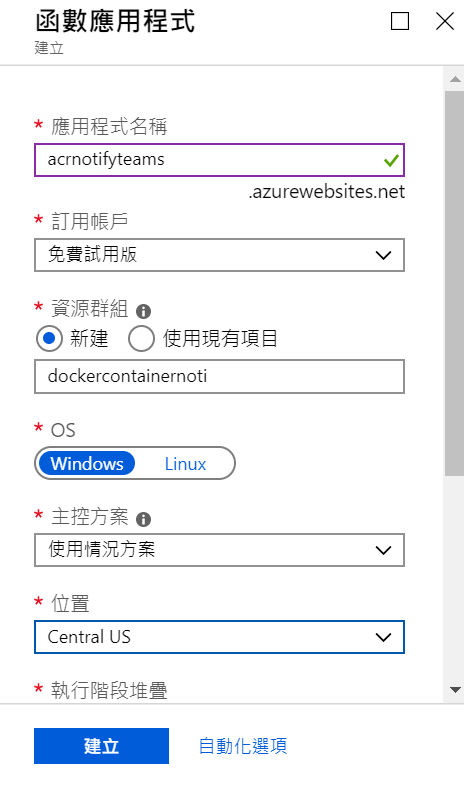
    接著要新增函式,在左邊選單選擇新增函式 > 入口網站 > Webhook + API 
    建立完畢後可以看到會有新增好的 Httptrigger1 的函式,右邊是要執行的 C# Code 相關功能
    先透過簡單的測試來看稍早在 Teams 的連接器是否 work,在一開始有提到 Teams 連接器 API 使用的 json 格式需要有 title & text,因此我先使用 httpclient 發送簡單的測試訊息測試
    提醒 : httpclient.PostAsync 網址就是上一步所複製的連接器 Url


    #r "Newtonsoft.Json"
    
    using System.Net;
    using Microsoft.AspNetCore.Mvc;
    using Microsoft.Extensions.Primitives;
    using Newtonsoft.Json;
    
    public static async Task<IActionResult> Run(HttpRequest req, ILogger log)
    {
        log.LogInformation("C# HTTP trigger function processed a request.");
    
        var client = new HttpClient();
     
        var json = "{\"title\": \"Title Test\", \"text\": \"9527 就是你的終身代號\"}";
        log.LogInformation(json);
        await client.PostAsync("https://outlook.office.com/webhook/yourteamsurl", new StringContent(json, System.Text.Encoding.UTF8, "application/json"));
         
        return (ActionResult)new OkObjectResult($"ok");
    } 
    測試後即可看到 Teams 正常收到所發送的訊息
    設定 Webhook
    接著回到 Container Registry 頁面,新增 Webhook 並在服務 url 的地方加上稍早建立 Azure function 網址
    在根據 webhook 發送的通知 json 內容調整 azure function 如下
    #r "Newtonsoft.Json"
    
    using System.Net;
    using Microsoft.AspNetCore.Mvc;
    using Microsoft.Extensions.Primitives;
    using Newtonsoft.Json;
    
    public static async Task<IActionResult> Run(HttpRequest req, ILogger log)
    {
        log.LogInformation("C# HTTP trigger function processed a request.");
        
        string requestBody = await new StreamReader(req.Body).ReadToEndAsync();
        dynamic data = JsonConvert.DeserializeObject(requestBody);    
        string repository = data?.target.repository;
        string tag = data?.request.tag;
        
        var client = new HttpClient();
     
        var json = "{\"title\": \"Docker Image :" + repository + " pull success\", \"text\": \"" + repository + ":" + tag + "\"}";
        log.LogInformation(json);
        await client.PostAsync("https://outlook.office.com/webhook/4cbb9e75-0910-41e3-81ec-84a158988cc4@938ecd8f-754e-4e60-883d-bad2b0b26a9e/IncomingWebhook/1ab11e49ab0f4497922cef639d185223/42c59a4e-ea5b-43d8-8edb-21f3572bf85a", new StringContent(json, System.Text.Encoding.UTF8, "application/json"));
         
        return (ActionResult)new OkObjectResult($"ok");
    } 
    測試上傳 Docker Image
    在重新上傳一次 docker image,即可看到已成功通知 Teams
    格式內容可以再依據需求調整,Docker Image 上傳至 Azure Container Registry 整合 Team 宣告整合成功 :)


    2021年11月17日 星期三

    [NETCore] 如何在 ASP.NET Core Middleware 加上單元測試 Unititest

    前言
    Middleware 在 ASP.NET Core 開發時是個很常見的功能,概念很像 ASP.NET Application Life cycle 管線的 Handler 機制 (若對於 Life Cycle 想了解更多可以看之前寫的文章 Application Life Cycle),提供開發者可以在 Request 進入到 Application 前加上客製化的邏輯,實務上用起來挺方便的也蠻好用的,在加上 middleware 相關邏輯後也會加上單元測試,確保所撰寫的邏輯有驗證過且是沒有問題,也避免在 middleware 異常時 Devops 同仁半夜叫你起床處理(萬萬不可阿,這篇文章要說明的是如何在 middleware 加上 unittest,對有經驗的開發者相信是一塊小蛋糕,內容若有問題歡迎提出來一起討論。


    建立檢查 Token Middleware
    舉一個常用的例子,實務上在與第三方在做串接時需要 token 作為對方請求的驗證,作為過濾不必要的請求以節省伺服器的資源。全部 API 接口都需要做 token 檢查因此將此邏輯檢查可以放在 Middleware,首先建立一個新的 .NET Core 3.1 WebAPI 專案,接著建立 TokenVerificationMiddleware.cs 類別,在此類別中加入下列代碼
    public class TokenVerificationMiddleware
    {
    	private readonly RequestDelegate _next;
    
    	public TokenVerificationMiddleware(RequestDelegate next)
    	{
    		_next = next;
    	}
    
    	public async Task Invoke(HttpContext context)
    	{
    		if (context.Request.Headers.ContainsKey("token") && context.Request.Headers["token"] == "marcusblog")
    		{
    			await _next.Invoke(context);
    		}
    		else
    		{
    			context.Response.StatusCode = 403;  // UnAuthorized
    			await context.Response.WriteAsync("Invalid request token");
    			return;
    		}
    	}
    }
    
    在此類別的代碼中定義了當請求來時檢查 Request 的 Header 資訊是否有包含 token 關鍵字,token 有的話是否等於 marcusblog,如果都符合就讓此請求往下一步進行進入到下一個流程像是 Action 邏輯;相反的如果不符合 token 檢查邏輯,就會回傳 403 等 Status Code。
    當建立好檢查 Token 的 Middleware 之後,接著開啟專案中的 StartUp.cs 類別在 Configure 方法中加上以下代碼
    app.UseMiddleware();
    
    上述是使用內建的 UseMiddleware 方法並定義指定的 Middleware 類別,另外還可以使用擴充方法(Extensions Method)達到使用 Middleware,也是個人比較推薦的方式,將要使用的 Middleware 統一集中在特定的class中代碼在閱讀上較為容易理解,使用方式是新增 ApplicationBuilderExtension 類別,裡面新增 UseTokenVerificationMiddleware 方法並定義回傳 IApplicationBuilder 型別,內容與在 startup.cs 的一樣
    public static class ApplicationBuilderExtension
    {
    	public static IApplicationBuilder UseTokenVerificationMiddleware(this IApplicationBuilder builder)
    	{
    		return builder.UseMiddleware();
    	}
    }
    
    接著再回到 Configure 方法將 UseTokenVerificationMiddleware 取代原本的方法
    //app.UseMiddleware();
    app.UseTokenVerificationMiddleware();
    
    開啟偵錯進行測試,可以發現網頁打開會因為 Request 中沒有在 Header 中帶 token 參數出現 Invalid request token,畫面如下


    加上單元測試
    一般來說請求進到 Application 的 Request 請求的內容會存在於 HttpContext 中,接著再把 HttpContext 的請求傳遞到所指定的 Middleware 邏輯中,也就是在建構子中的參數 HttpContext,那麼要進行單元測試的話第一步是要先模擬請求的 HttpContext 物件,這邊可以使用 DefaultHttpContext 達到這目的,DefaultHttpContext 繼承了 HttpContext 抽象類別,讓我們在單元測試中更為方便,舉例來說如果要模擬 hpptContext 物件並在 Header 加上 token 內容用下列方式就可以達到
    var context = new DefaultHttpContext();
    context.Request.Headers.Add("token", "this is a book");
    
    DefaultHttpContext 還可以指定測試的路徑(Path)、內容(Body)、ContentType 或是可以指定 Cookie Form 及 QueryString 等常見的設定值,使用上相當的簡易與方便,放在測試案例中代碼如下
    public class TokenVerificationMiddlewareTest
    {
        private TokenVerificationMiddleware _target;
        [SetUp]
        public void Initial()
        {
            _target = new TokenVerificationMiddleware(null);
        }
    
        [Test]
        public void Correct_Header_Should_Return_Success()
        {
            var context = new DefaultHttpContext();
            context.Request.Headers.Add("token", "marcusblog");
    
            var result = _target.Invoke(context);
            context.Response.StatusCode.Should().Be(200);
        }
    
        [Test]
        public void Without_Header_Should_Return_UnAuthorized()
        {
            var context = new DefaultHttpContext();
    
            var result = _target.Invoke(context);
            context.Response.StatusCode.Should().Be(403);
        }
    
        [Test]
        public void Empty_Header_Should_Return_UnAuthorized()
        {
            var context = new DefaultHttpContext();
    
            var result = _target.Invoke(context);
            context.Response.StatusCode.Should().Be(403);
        }
    
        [Test]
        public void Wrong_Header_Should_Return_UnAuthorized()
        {
            var context = new DefaultHttpContext();
            context.Request.Headers.Add("token", "wrongtoken");
    
            var result = _target.Invoke(context);
            context.Response.StatusCode.Should().Be(403);
        }
    }
    
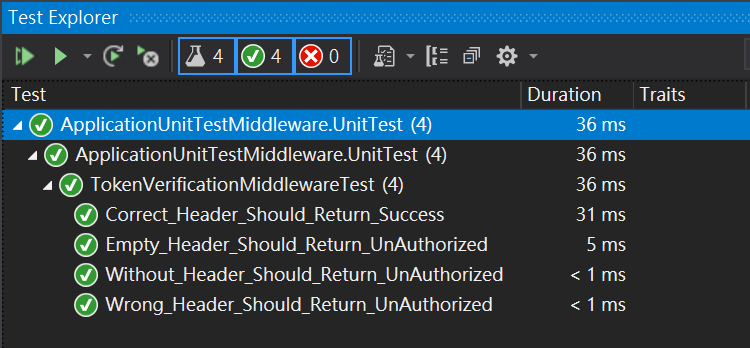
    以上是使用 nUnit 搭配 FluentAssertions 套件,測試幾種常見的情境像是 token 為空、header 為空、帶錯誤的 token及帶正確的 token 值 測試後的結果 Pass 成功 !
    大功告成,打完收工

    感想
    在 ASP.NET Core 有了 httpDefaultContext 之後,在針對 Middleware 撰寫單元測試變得方便許多,對有經驗的開發者來說也是小蛋糕一塊,如果有不清楚的地方歡迎一起討論,hope it helps !

    參考
    為 .NET Core Middleware 加上 Unit Test
    DefaultHttpContext Class
    ASP.NET Core 執行原理解剖[4]:進入HttpContext的世界
    ASP.NET Core 中介軟體
    ASP.NET Core 2.1 middlewares part 2: Unit test a custom middleware


    2021年11月3日 星期三

    [NETCore] ASP.NET Core 使用強型別取代 IOption 注入配置

    前言
    之前的 如何取得 appsettings.json 組態設定 文章中有介紹在 ASP.NET Core 中透過 IOptions 方法取得設定檔的方法,在需要用到的地方注入 IOptions 取得設定類別的資訊,相信使用上並不困難在 MSDN 官方推薦作法也是如此,但如果開發一陣子之後可以發現到處都是 IOptios 類別,這篇文章介紹如何使用擴充 IServiceCollection 的方法來降低對 IOptios 的依賴,若有問題或是錯誤的地方歡迎各方高手大大一起討論或給予指導

    IOption
    之首先先來簡單回顧  IOptions<T>  的傳統用法,透過微軟 MSDN 中 IOptions 介紹得知要使用前需先引用 Microsoft.Extensions.Options,為了方便快速了解差異性,這裡建立一個 ASP.NET Core Web 應用程式範例來說明,在新增完應用程式後在 appsetting.json 加入自己定義的  mySettings  設定資訊提供 Name 以及 Title 屬性
    "MySettings": {
        "Name": "Marcus",
        "Title": "9527"
      } 
    接著要取得設定檔的內容,這邊建立與 Config 內容欄位相同的強型別的 class 物件
    public class MySettings
    {
        public string Name { get; set; }
        public string Title { get; set; }
    } 
    在 ConfigureServices 中加入下列代碼,用意是將 appsettinss.json 中的資訊加載到 MySettings 中
    public void ConfigureServices(IServiceCollection services)
    {
        services.AddMvc().SetCompatibilityVersion(CompatibilityVersion.Version_2_2);
        services.AddOptions();
        services.Configure<MySettings>(Configuration.GetSection("MySettings"));
    } 
    接著就可以在 Value Controll 使用 IOptions<T> 取得設定檔的資訊,代碼如下
    public class ValuesController : ControllerBase
    {
        public MySettings _mySettings { get; set; }
    
        public ValuesController(IOptions<MySettings> settings)
        {
            _mySettings = settings.Value;
        }
    
        // GET api/values
        [HttpGet]
        public ActionResult<IEnumerable<string>> Get()
        {
            return new string[] { _mySettings.Name, _mySettings.Title };
        } 

    不使用 IOptions 注入
    以上快速地回顧 IOptions<T> 的用法,就可以簡單使用 IOption<T> 取得 appsettings.json 設定資訊的方法,但是這意味著你的代碼與 IOptions 有著強制依賴的關係,你有多少 Controller 就需要在各別的 Controller 中都 using 所需要的 Microsoft.Extensions.Options,除非 appsettings.json 中的設定很常異動需要進行重新載入( 這時可以使用  IOptionMonitor  而不是 IOptions ),否則大部分的使用情境中 config 設定都是較少異動的,參考此文章之後有了新的解法,我們可以新增一個類別並針對 IServiceCollection 加入擴充方法,代碼如下
    public static class ServiceCollectionExtensions
    {
        public static TConfig ConfigurePOCO<TConfig>(this IServiceCollection services, IConfiguration configuration) where TConfig : class, new()
        {
            if (services == null) throw new ArgumentNullException(nameof(services));
            if (configuration == null) throw new ArgumentNullException(nameof(configuration));
    
            var config = new TConfig();
            configuration.Bind(config);
            services.AddSingleton(config);
            return config;
        }
    } 
    這裡我們在 startup.cs 時手動使用  Microsoft.Extensions.Configuration.Binder  來綁定設定檔,並指定服務容器生命週期 (LifeTime) 為 Singleton,在 ASP.NET Core DI 預設提供的 Lifetime 有下列三種
    • Transient : 每次請求時都會產生新的 Instance
    • Scoped : 每個 http Request 都會產生一份 Instance
    • Singleton : 整個 Application 只會有一份 Instance
    可以依據所需要情境作調整,如果想了解差異可以參考之前的文章 : 傳送門 

    新增完擴充方法之後,接著下一步就是在 ConfigureServices 改用新增的擴充方法 confugurePOCO
    public void ConfigureServices(IServiceCollection services)
    {
        services.AddMvc().SetCompatibilityVersion(CompatibilityVersion.Version_2_2);
        services.AddOptions();
        services.ConfigurePOCO<MySettings>(Configuration.GetSection("MySettings"));
        //services.Configure<MySettings>(Configuration.GetSection("MySettings"));
    } 
    接著在回到要使用的地方也就是範例的 ValueController, 將 IOptions 依賴移除改為強行別的 MySettings
    public MySettings _mySettings { get; set; }
    
    public ValuesController(MySettings settings)
    {
        _mySettings = settings;
    } 
    在重新執行應用程式,可以發現應用程式執行正常無誤
    如果你對於擴充方法很熟悉,也可以針對自己的需求來自訂所需的方法簽章,例如新增一個 TConfig 參數做為繫結設定檔代碼如下
    public static class ServiceCollectionExtensions
    {
        public static TConfig ConfigurePOCO<TConfig>(this IServiceCollection services, IConfiguration configuration, TConfig config) where TConfig : class
        {
            if (services == null) throw new ArgumentNullException(nameof(services));
            if (configuration == null) throw new ArgumentNullException(nameof(configuration));
            if (config == null) throw new ArgumentNullException(nameof(config));
     
            configuration.Bind(config);
            services.AddSingleton(config);
            return config;
        }
    } 
    使用方式先 new 之後作為參數傳入
    public void ConfigureServices(IServiceCollection services)
    {
        services.AddMvc();
     
        var mySettings = new MySettings("foo"); 
        services.ConfigurePOCO(Configuration.GetSection("MySettings"), mySettings);
    } 
    或者是新增 Func<TConfig> 參數透過委派方法新增 TConfig 的 instance
    public static class ServiceCollectionExtensions
    {
        public static TConfig ConfigurePOCO<TConfig>(this IServiceCollection services, IConfiguration configuration, Func<TConfig> pocoProvider) where TConfig : class
        {
            if (services == null) throw new ArgumentNullException(nameof(services));
            if (configuration == null) throw new ArgumentNullException(nameof(configuration));
            if (pocoProvider == null) throw new ArgumentNullException(nameof(pocoProvider));
    
            var config = pocoProvider();
            configuration.Bind(config);
            services.AddSingleton(config);
            return config;
        } 
    }
    使用方式如下
    public void ConfigureServices(IServiceCollection services)
    {
        //...
        services.ConfigurePOCO(Configuration.GetSection("MySettings"), () => new MySettings("foo"));
        //...
    } 
    如果想了解更多細節,可以參考 Strongly typed configuration in ASP.NET Core without IOptions<T> 取得更多資訊,希望透過以上的介紹,可以讓跟我有一樣困擾的開發者得到新的作法,Hope it helps :)

    2021年10月23日 星期六

    [conference] MOPCON 2021 - 探討開源平台 SigNoz,實施大規模分佈系統遙測的挑戰

    分享心得
    網站上線後往往才是挑戰的開始,在大神 Ant 推坑下報名了 MOPCON,跟與會的朋友分享 #Signoz 這套開源的工具,其中也帶到 #可觀察性 與 #監控平台應具備特性 等自己有興趣的議題。也趁空檔跟一些講者聊聊各自研究的議題,在活動結束後回想,都覺得收穫最多的不是別人而是自己,也很感謝在準備過程中協助 review 的朋友跟夥伴,希望這次在濁水溪以南最強大行動科技年會的分享聽眾都有收穫,等待 MOPCON 官方把影片上架構在分享給大家,若有任何問題歡迎提出來一起討論。

    議程介紹
    主題 : 探討開源平台 SigNoz,實施大規模分佈系統遙測的挑戰
    在服務切割越來越微細的世代,系統上線後的監控也變得越來越複雜
    為了監控雲端應用服務上線後的可用性,可能會使用不同的工具像是 Prometheus、Grafana 或是 Jaeger 來達到其目的
    ,或是使用一些整合性高須付費的 SaaS 服務像是 DataDog、NewRelic 等。
    有沒有一個框架可以在監控上整合各服務間的問題且免費的呢?
    SigNoz 是一個開源且功能強大的監控平台,透過此框架內建常見的 RPS, 50th/90th/99th 等監控指標,當請求進來後在各個服務的跟蹤指標資訊都可以查看到,發生問題時可以快速找到根本問題與排除。
    透過 OpenTelemetry 函式庫建立與管理各服務的監控數據,支援跨程式語言能夠整合常見的服務與工具。
    在本議程會與大家分享下面幾個議題
    ➊ SigNoz 要解決什麼問題呢 ?
    ➋ OpenTelemetry 是甚麼 ? OpenTelemetry 是如何做到服務之間的數據追蹤、蒐集與分析的呢
    ➌ SigNoz 的優點與缺點是什麼呢 ?
    

    主辦單位 : MOPCON 堅持濁水溪以南,最大行動科技年會
    議程表 : 連結
    共筆 : https://hackmd.io/@mopcon/2021/%2FDRb25K2eS5KD96WcAgHBzQ


    影片連結

    Copyright © m@rcus 學習筆記 | Powered by Blogger

    Design by Anders Noren | Blogger Theme by NewBloggerThemes.com